Quick Tips for Using the Graduated Filter in Lightroom
As mentioned above, a Graduated Filter allows you to adjust or edit parts of your image (from the edge of the image, in toward the center). So it's perfect for darkening the sky, lightening the foreground, or even darkening a corner that's just too bright (see example below). This is called a local adjustment because it only applies to or.

Lightroom Graduated Filter The Ultimate Guide
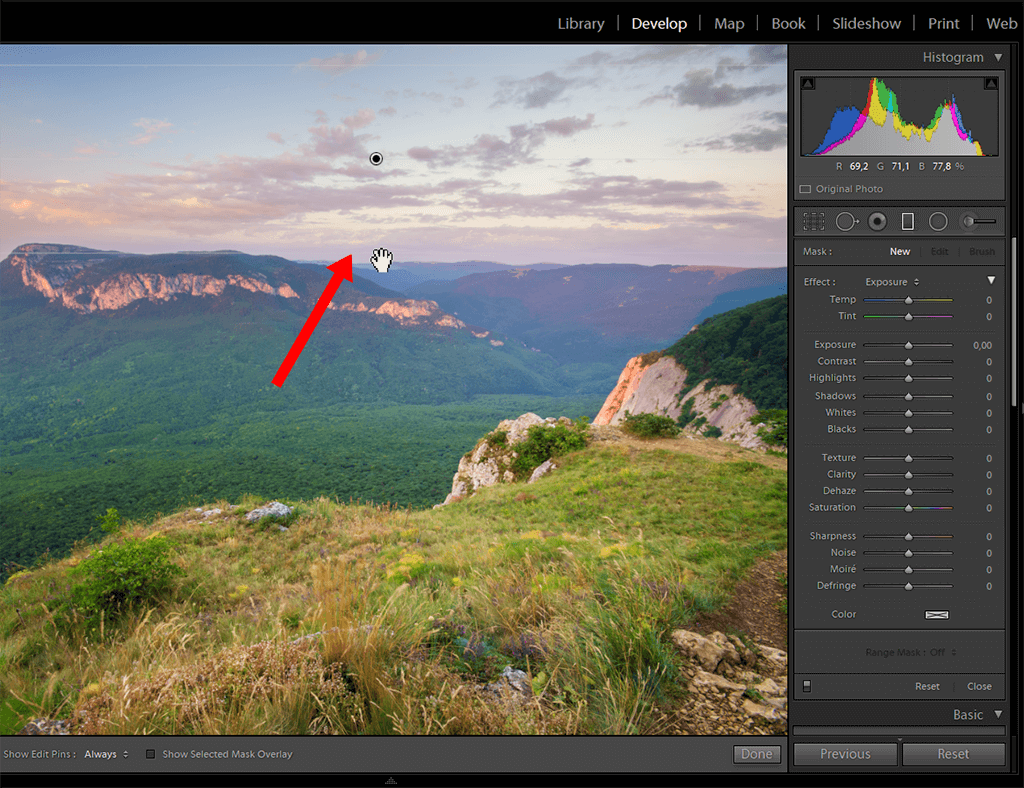
1. Activate the Graduated Filter. After importing the image, go to the Develop menu. Press the Graduated filter icon that is located under the Histogram. After clicking the icon, you'll be greeted by a menu that looks like the "Basic" panel, as it also has sliders for adjusting the color temperature, exposure, etc. Move the cursor to the.
How to Use Graduated Filter in Lightroom Tutorial for Beginners
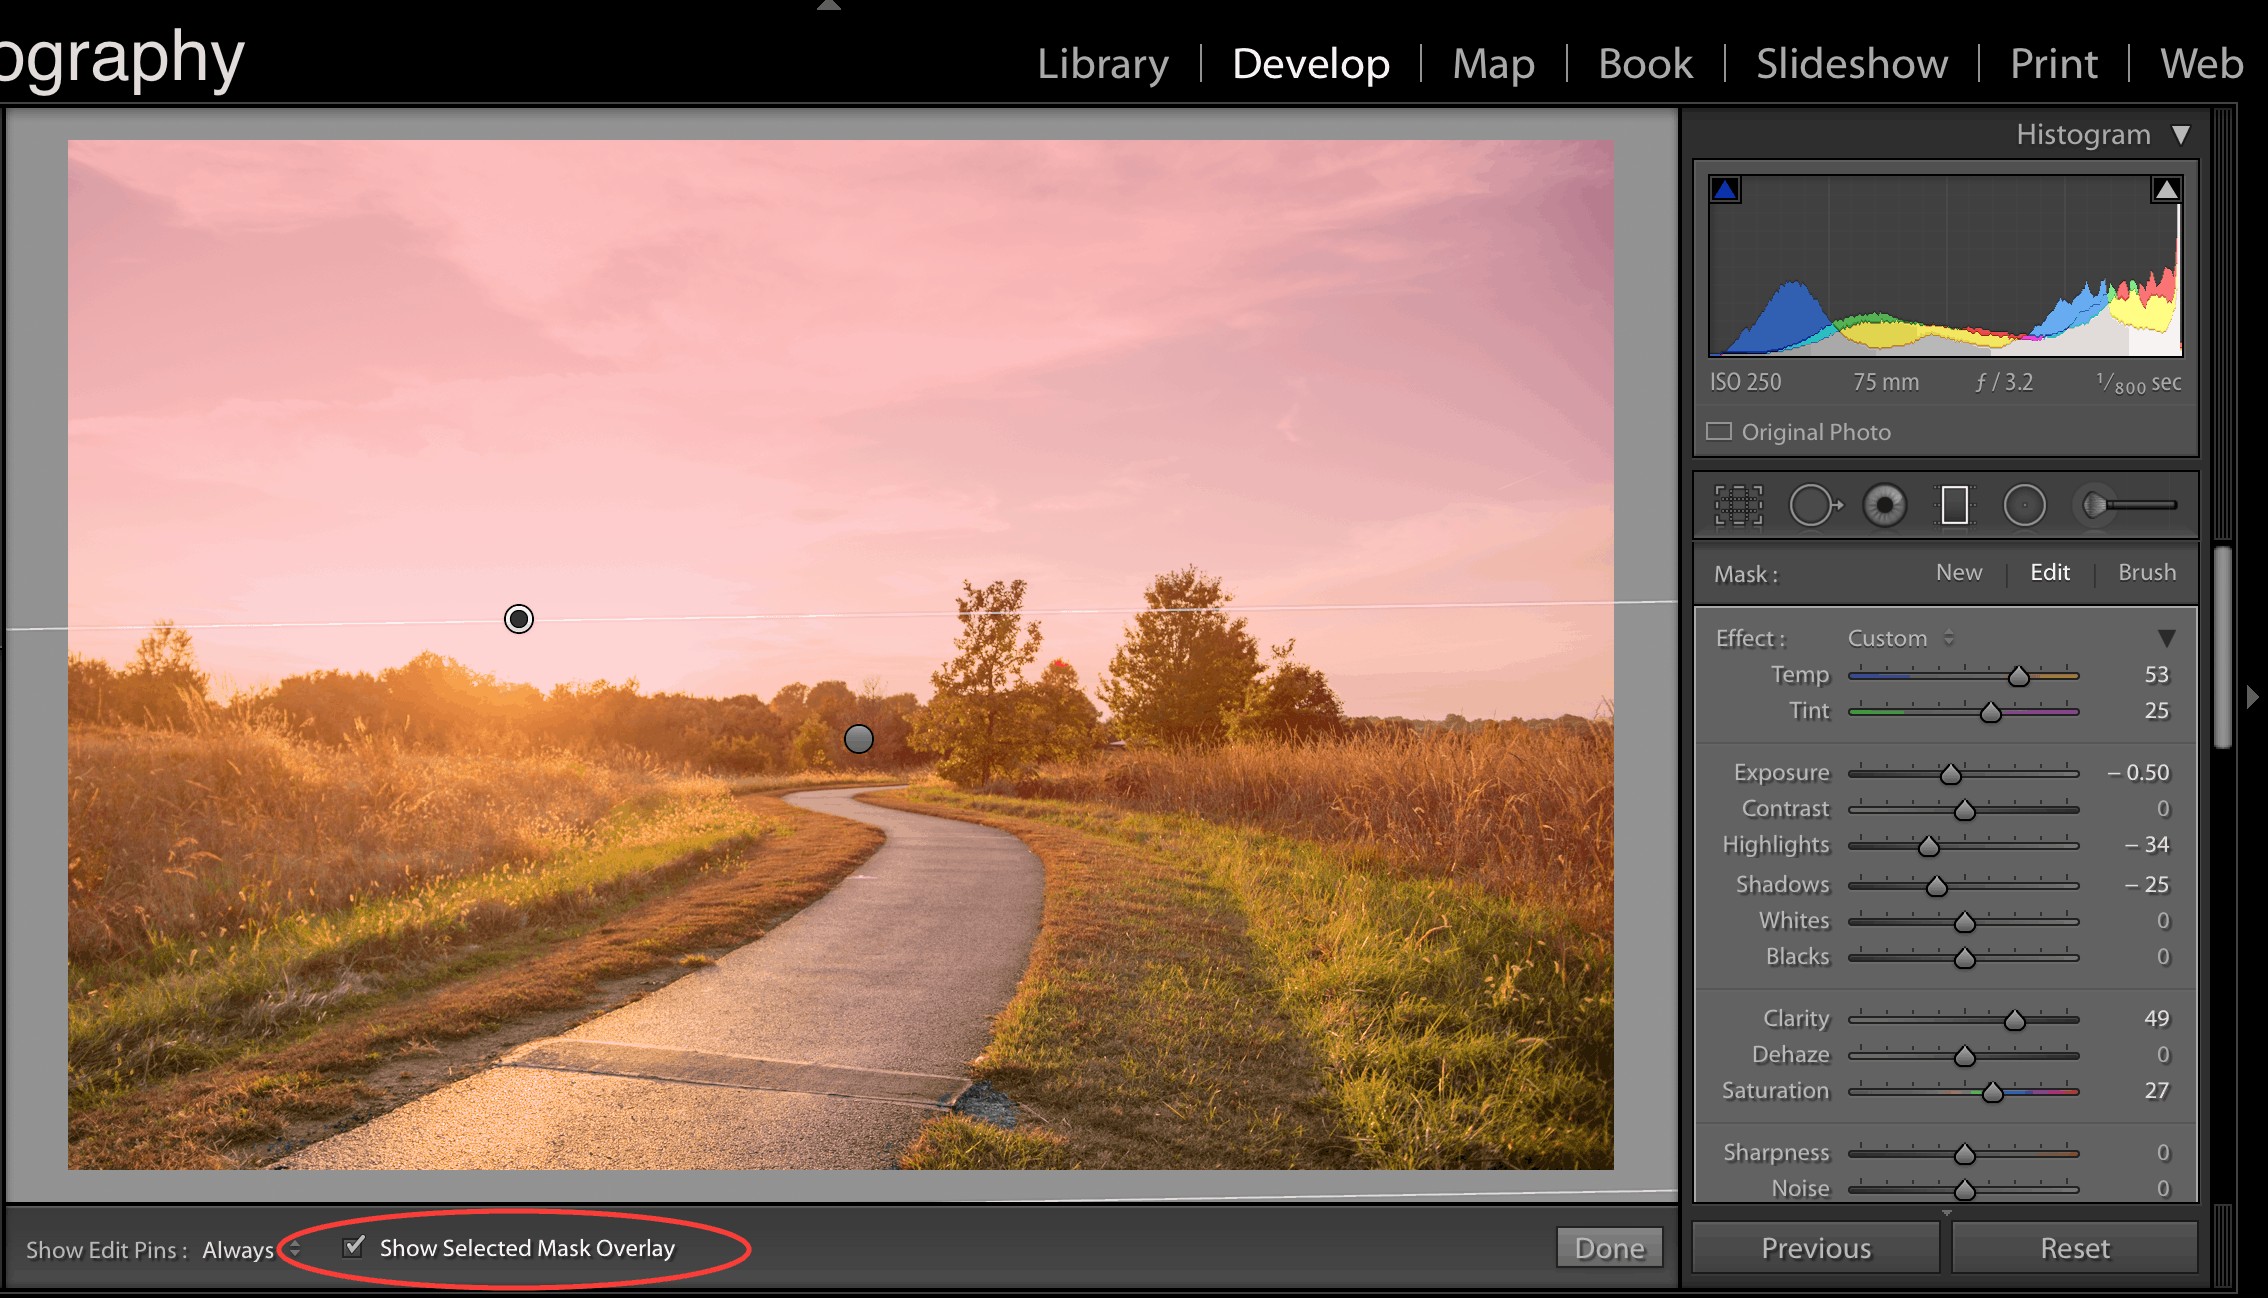
1. Go to the Masks panel, then Create New Mask and Select Background. In the Masks panel it looks something like this. 2. Click the Subtract button and select Linear Gradient from the options. Hold the left mouse button down and drag the cursor across the image to place the Linear Gradient.

A helpful Guide on how to use the Graduated Filter in Lightroom and Camera Raw — Daniel Gastager
Using the Graduated Filter. To use it, either use keyboard shortcut 'M' or simply click on the icon, and the Graduated Filter adjustment panel will be revealed. You can select from any of these sliders to make adjustments to your image. To apply a graduated filter to your image, simply hold the left mouse button down and drag the filter.
How to Properly Use the Graduated Filter Tool in Adobe Lightroom
6 Tips for Using the Linear Gradient Tool. 1. Linear Gradient Shortcut. The keyboard shortcut for getting to the Linear Gradient mask is M. Tapping the "M" key will open the linear gradient dialog box. The sliders and panel that will open looks similar to the basic panel (with lots of sliders - many having the same names), so don't let that.

Lightroom Range Mask Precision Luminosity and Color Masking
Using the Graduated Filter. You can drag your filter from either side of your image toward the middle. Or from the top, bottom or from a diagonal direction. You can turn the Mask feature on (keyboard shortcut is O), which helps you see where the graduated filter thins out. You can even change the color of the mask (Shift + O and cycle through.
Lightroom Classic How to use a Graduated Filter and Range Mask YouTube
Lightroom didn't even use the term "mask" for most operations, instead opting for the word "filter" - which wasn't really an accurate description of the work being done. The sheer power and flexibility of the Radial, Graduated, and Brush filters was amazing, but the workflow was often slow, especially when editing dozens or.

5 Minute Photo Adobe Lightroom Graduated Filter Tool YouTube
Once you have your photo inside of Lightroom, head into the develop module. The graduated filter tool is inside the toolbox at the top of the right-hand sidebar. Once you click on the tool, you.

Range Masking In Lightroom Classic The Creative Photographer
I will take you through the Graduated Filter Tool in Lightroom Classic in its entirety. Including Luminance and Colour Range Masks. The first half will be an.
lightroom graduated filter range masks luminance_2 I will be your photo guide!
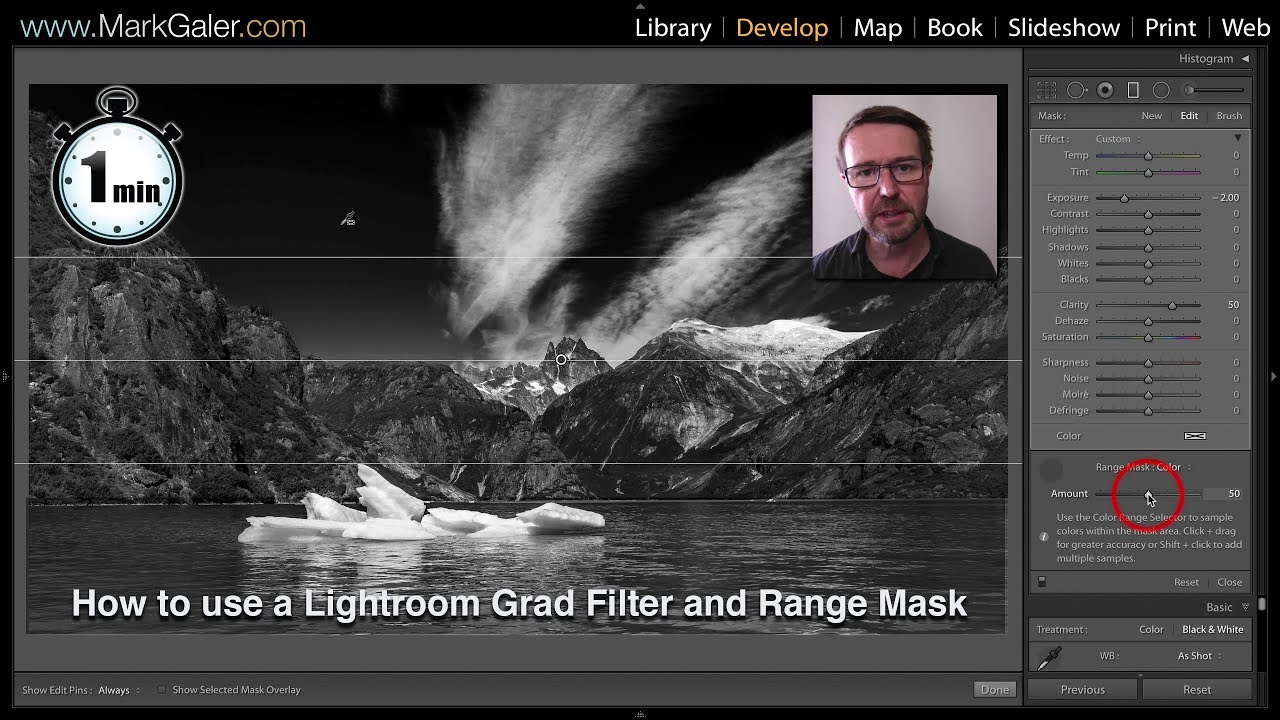
Although kicking around Lightroom since 2018, not many people have heard of the Range Mask. In the graduated filter scroll down the right-hand panel to reveal the Range Mask option. With a.

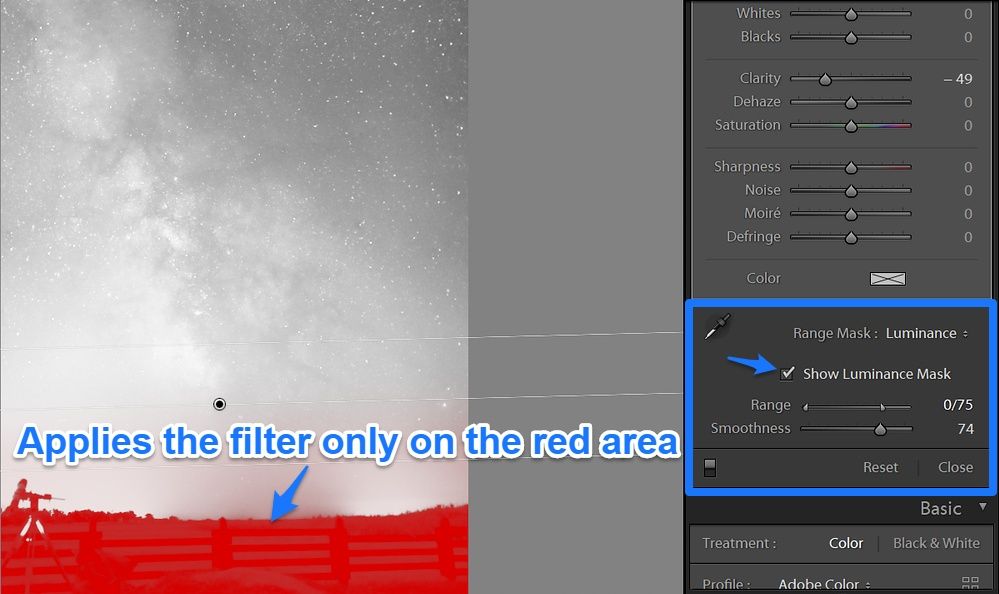
Range Mask is an addition to the local adjustment tools (Adjustment Brush, Graduated Filter, and
Check Show Luminance Mask. By sliding the left side of the range slider to the right, we can reduce the effect of the graduated filter in the shadow areas only. We can use a combination of range and smoothness to bring back just the tree area. Once done, uncheck the Show Luminance Mask to check the effect.
How to Blur Background Using Lightroom Your Ultimate Guide
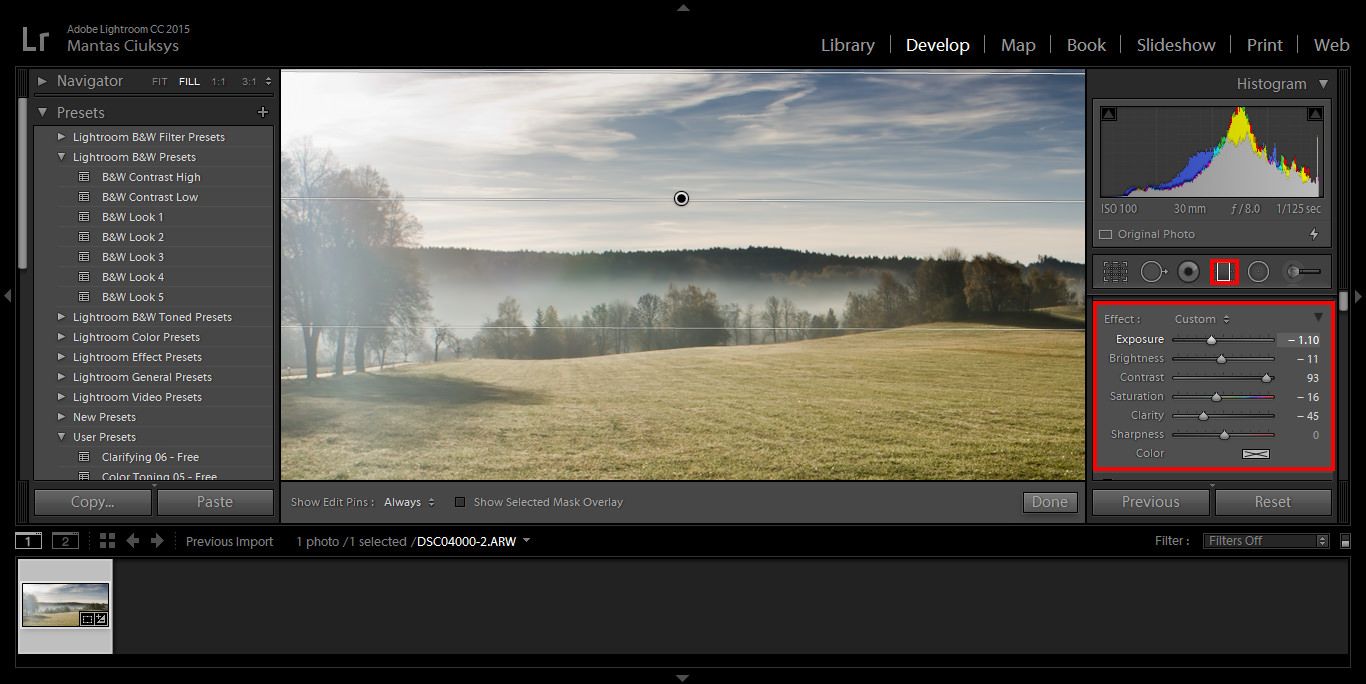
Press D to go into the Develop module. On the right side under the Histogram panel, click the Graduated Filter tool . In the panel that appears, from the Effect menu, select Exposure. Below that, drag the Exposure slider to the left, to around − 1.80. Hold Shift, then click and drag from the topmost center point of the photo to a little past.

How to use graduated filter lightroom Photo Editing Lightroom, Adobe Lightroom, Lightroom
Graduated Filters will create a mask that affects an area of the image in a linear direction, while the Radial Filter will affect them in a circular area. This shape can be adjusted and rotated to any kind of circle/ellipse, so the possibilities are endless when creating your masks. Most of the time, the main reason to use either of these tools.

Adobe Lightroom How to Use Lightroom's Graduated Filter Tool YouTube
In Lightroom filters are editing tools and there are two. They are the: Graduated filter (as of 2022 it's the Linear Gradient in the Masking Panel) Radial filter (as of 2022 it's the Radial Gradient in the Masking Panel) With just these two Lightroom filters you can completely change the look of a photo with targeted adjustments to parts of.
Mastering the Graduated Filter in Adobe Lightroom Infrared Conversions, IR Modifications
How to use a Lightroom Graduated Filter and Range Mask in Lightroom Classic. This is a powerful tool to adjust selected tones or colours in your creative edi.
How to Use Graduated Filter in Lightroom Tutorial for Beginners
The Lightroom Graduated filter, also referred to as the Lightroom Linear Gradient, is an editing tool designed for targeted adjustments: Apply a Graduated filter, and Lightroom creates a gradated edit across your image. The effect starts out at 0, then slowly works its way toward 100 as it moves across the image.
